
Acidic Glavenus
Glavenus Trailer
A tour with the Handler
Welcome To Hoarfrost Reach
Story Trailer
Gameplay Reveal Trailer
See the data tab for more info on the weapons and mantles.

Tigrex: A flying wyvern straight out of prehistory, known for its deafening roar and powerful legs that drive its overwhelming charge.
Shrieking Legiana: A Legiana variant shrouded in white frost. It specializes in freezing prey with the powerful chill it emits, then swooping down to strike at them from overhead.
Banbaro: A monster with two giant horns, like a running brick wall. It charges at threats while digging its massive horns in the ground, sometimes picking up entire trees along the way.
Beotodus: A piscine wyvern that uses the sharp fin on its head to cut through the frozen soil, swimming freely through the snow. Can often be seen hurling snow at its prey using its leg fins.
Nargacuga: A flying wyvern covered in pitch black fur. It is extremely agile, especially on the ground, moving with explosive bursts of speed.
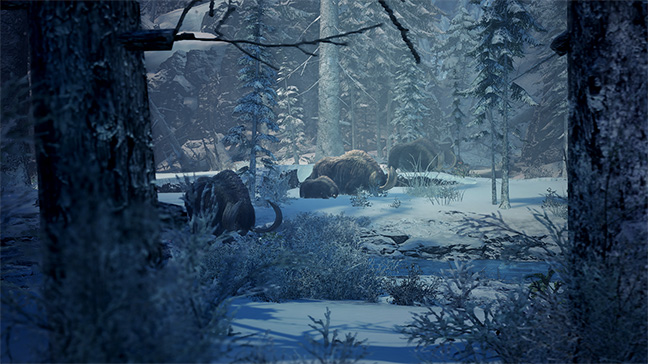
Hoarfrost Reach
A cold, inhospitable region, covered in snow and ice. It may look inhospitable, but it's teeming with unique endemic life.
Popo are herbivores with a thick coat to protect against the cold. Generally docile creatures that will run off in a herd if attacked. However, the adult males will boldly counter with their tusks to protect their offspring.
Sometimes you'll have to make your way through waist-deep snow. Pick hot peppers to craft hot drinks in order to stave off the cold.
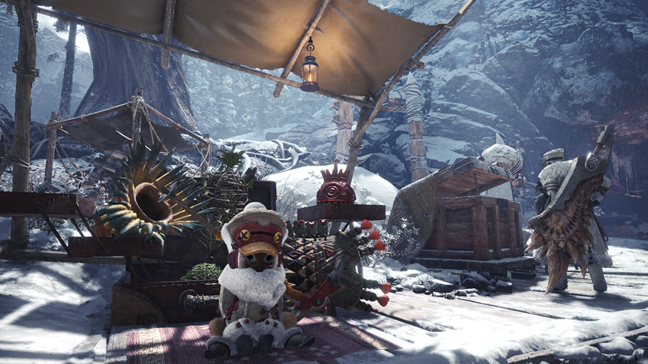
Seliana
A new base built as the headquarters for investigations in the Hoarfrost Reach.
It's complete with a variety of useful facilities and features to rival those of Astera, all of which are powered by the land's plentiful geothermal energy.
Seliana features all of the same facilities that are essential to your investigations, such as the Ecological Research Center, the Smithy, the Resource Center, and the rest.
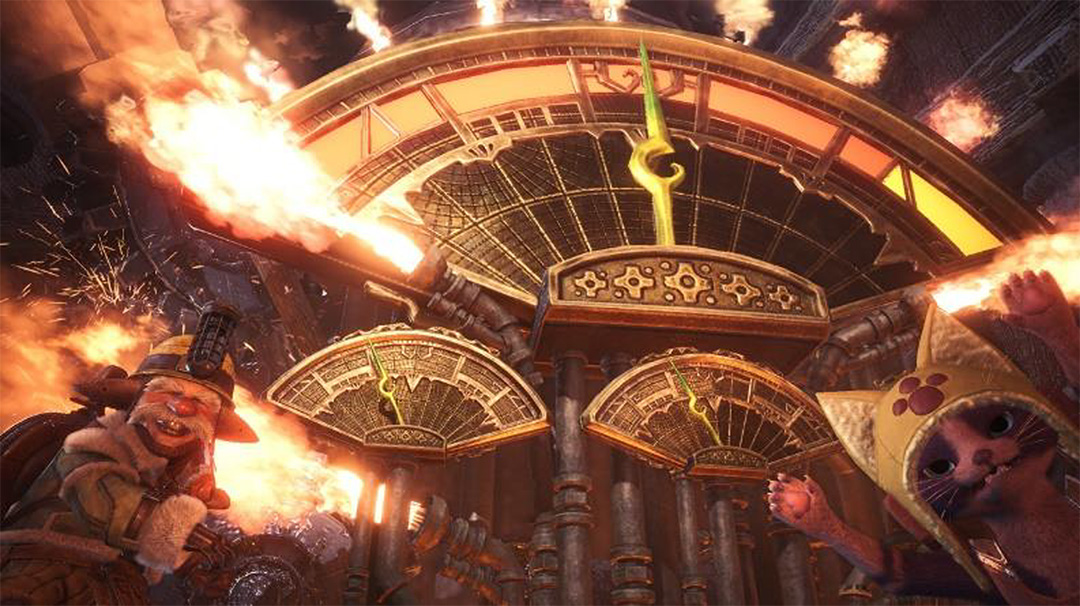
The Steamworks
The Steamworks is a new facility in Seliana that burns fuel to create steam, which is used to power the rest of the facilities in the new HQ!
Fuel accumulates automatically after completing quests. You can also obtain it in exchange for items and ore materials.
By collecting fuel and using it to help out at the Steamworks, you can earn all sorts of extra items!
Use fuel (points) to help the Steamworks make steam for the base! You'll obtain items based on how well you perform in a mini-game that challenges you to guess correct button combinations. Try it out in-between quests!
A New Mode of Transport: Raider Ride!
Raider Ride lets you use small monster tailraiders as a mode of transportation. Whistle to call a tailraider, and then get ready to ride!
Pin your destination on the wildlife map and you'll be taken there automatically. If you don't pin a destination, your raider ride will try to find tracks, so you can track a target while prepping for a hunt.
While on a raider ride, you can gather, use items and your slinger, open your wildlife map, as well as other specific actions.
You cannot control the monster directly.
HBG
Special Scope Mod: You will aim in first person, and your reticle turns orange. Deal massive damage by hitting monsters in super-critical distance.
Wyvernheart Change Mod: Hitting Wyvernheart shots consecutively will increase your damage output. (Cannot equip multiple.)
Wyvernsnipe Change Mod: Changes the function of your Wyvernsnipe shot. No longer pierces, but instead does massive damage to weak spots. (Cannot equip multiple.)
Common mods for LBG and HBG:Weight Booster: Your shots pierce monsters more easily, increases KO and Exhaust damage. Cannot be used in conjunction with Speed Booster.
Speed Booster: Increases bullet velocity, extending range and critical distance. Cannot be used in conjunction with Weight Booster.
LBG
The LBG is fast when it comes to pulling the slingshot. Pull yourself up to a monster and reload your ammo.
Evade Reload Mod: Load a round during a sliding evade. Compatible with ammo types with long reload times or low clip sizes, and allows you to keep firing without having to stop moving. Equip multiple mods to increase the number of reloaded rounds.
Wyvernblast Counter Mod: Turns your Wyvernblast into a forward-firing counterattack. Your recovery time is long and the detonation window is short, but if a monster detonates it with an attack, you can expect a great deal of damage. (Cannot equip multiple.)
Bow
Thousand Dragons: A short-range but very powerful attack that can be used while aiming your slinger. Will consume all of your equipped slinger ammo. If you do not have any ammo, the move's power drops.
Aim Switch: While aiming, press a button to switch between your bow and your slinger. You can shoot slinger ammo or launch the clutch claw while aiming the slinger, and then hit the button again to switch back to your bow. Also applies for LBG and HBG.
IG
Kinsect Boost: Use slinger ammo to strengthen your kinsect. While boosted, your kinsect can collect up to two extracts, and the effect time of gathered extracts is extended. Furthermore, your kinsect gains special effects based on the slinger ammo used.
Effect 1: Kinsect Boost [Force]: Obtained by boosting with slinger ammo dropped by monsters. Your kinsect's attack power increases, and kinsect dust clouds are generated more frequently.
Effect 2: Kinsect Boost [Stamina]: Obtained by boosting with slinger ammo gathered in the field. Your kinsect's maximum stamina is increased, and your triple boost's effect time is extended.
Aerial Clutch Attack: You can perform clutch claw attacks in the air.
Assault Thrust: A downward piercing attack that can be used in the air. The attack used after landing will place a pheromone marker on the monster. If you use the attack with your kinsect on your arm, the kinsect will follow up on your attack.
CB
Hypercharge: Cancelling an SAED with the new Savage Axe Slash move puts you in Hypercharge mode. For a time, your axe attacks will hit continuously like a buzzsaw, and you will get additional benefits based on the type of phial you are using.
Element: Increase axe attack’s elemental damage - long boost time
Impact: Increase axe attack’s raw damage - short boost time
During hypercharge, your phials are continuously drained over time, and if you run out, the mode ends.
Slinger Burst: You can perform slinger bursts after axe attacks, or after guarding in sword mode. You cannot fire a slinger burst if you take too long after blocking, for example due to knockback, but your elemental boost state will make it easier to guard attacks without budging.
SA
Axe Boost: Power up your axe by performing a new finisher, which can be used after a certain number of wild swings. For a period of time, your axe attacks will flinch monsters more easily.
Special Clutch Launch: You can fire off the clutch claw during an elemental discharge. If you hit a large monster, you will cling to it. The clutch claw attack has a high phial output, and can quickly propel you into Phial Awakening state.
Zero Sum Clutch Discharge: During Phial Awakening, you can perform a Zero Sum Discharge while clinging to the monster.
Slinger Burst: You can perform Slinger Bursts after certain attacks in Axe Mode. You can also transition into a sword mode morph slash from a Slinger Burst.
GL
Wyrmstake Blast Loading: While aiming your slinger with your weapon drawn, you can load your slinger ammo into your Gunlance for a Wyrmstake Blast. Loading uses all of your remaining slinger ammo. Depending on the type and amount of ammo loaded, the time the Wyrmstake Blast is wedged into the monster changes.
Wyrmstake Blast: Hitting a monster wedges the Wyrmstake Blast into the monster for a certain period of time. Hitting the Wyrmstake Blast with shelling causes it to explode and do damage. The amount of damage dealt by the explosion depends on the strength of the shell that triggers it.
Lance
Guard Shot: Reinforce your guard, and safely shoot from behind your shield. You can also switch between regular shots and slinger bursts with a button press. Unlike with a regular guard, you cannot move during this.
Claw Counter Stance: A stance that can be activated from the guard shot stance. It drains stamina during use, but if you are attacked, you will automatically cling to the monster with the clutch claw. If successful, you also become immune to knockback for a short period of time.
HH
Echo Waves: You can follow up another attack with this move, which generates an Echo Note on your Staff.
Echo Bubbles: Play a song using an Echo Note, and you will generate an Echo Bubble on the ground under you. Touching the Echo Bubble gives a unique song effect. Also, depending on the number of songs you played before Encoring, you can either generate another Echo Bubble with the same effect, or a better one, by performing an Encore.
Example of an Echo Song: Self-Improvement [Speed] & Evasion Up
A song using an Echo Note. A player touching the bubble gains increased evasion invulnerability for a time period, and if they are using a Hunting Horn, they also gain increased movement speed.
Hammer
Clutch Attacks after Charge Attacks: After an upswing or superpound, you can perform a clutch claw attack. You will cling to the monster if you successfully land it.
Slinger Burst: You can fire slinger bursts while charging, without losing your charge. Weave slinger bursts into your charges to minimize damage downtime.
DB
Evasion Slinger Burst: After a Double Slash attack, you can perform an evasive slinger burst. Aim to cause a flinch, then continue attacking after the evasion.
Unique Clutch Claw Attack: A unique attack that can be performed after the second spinning attack in Demon Mode. If you hit a monster, you will cling to it, and perform a rising spin slash with an additional input.
Rising Spin Slash: A technique derived from your clutch claw attack while Demonized. It has the same properties as a Clutch Attack, and will cause wound damage and drop slinger ammo.
SnS
Just Rush: A move that can easily apply status. Keep hitting attacks with exact timing to increase both your physical and elemental/status attack and do tons of damage.
Clutch Claw Upper: With your weapon drawn, attack after evading to perform an anti-air attack with your clutch claw. Hit, and you will cling to the monster.
Normal Shot / Slinger Burst Switch: Same as with normal shots, the Sword and Shield can fire Slinger Bursts at any time while your weapon is drawn. In the slinger firing stance, your regular Slinger Shots become Slinger Bursts. Sheathing your weapon switches back to Slinger Shots.
LS
Special Sheathe: You can sheathe your weapon after performing an attack, from which you can perform a Iai Quickdraw Slash, or Iai Quickdraw Spirit Slash.
Iai Quickdraw Slash: Landing this move grants automatic spirit gauge refill over time. If you time the attack according with an enemy's attack, the duration of the automatic spirit gain will increase, and the attack cannot be interrupted.
Iai Quickdraw Spirit Slash: A powerful attack that drops your spirit gauge by 1 level. If timed in accordance with an enemy's attack, you do not lose a spirit level, and cannot be interrupted.
Power Shot: You can fire a boosted slinger shot after a spirit slash. Aim to flinch monsters to continue your spirit combo.
GS
True Charged Slash (Power Blow): If you land the first hit of the TCS on a weak spot, the second hit becomes more powerful.
Power Shot: You can deliver a boosted slinger shot after an attack. From this, you can follow up into a True Charged Slash or Jumping Wide Slash.
Clutch Claw
Clutch Attacks by GS, Hammer, HH, Lance, SA, CB, HBG: You can easily wound monsters, creating more chances to do high damage.
Clutch Attacks by SnS, DB, LS, GL, IG, Bow, LBG: You can get guaranteed slinger ammo drops. You will also wound monsters, though only slightly.
During a Clutch attack, you can strike the monster's head to make it change direction. It's useful if you want to send a monster in a specific direction, but it also has the effect of making the monster easier to wound. This will not work on enraged monsters.
Slinger Burst: While Clutched to the head, you can blast your whole supply of slinger ammo in the monster's face and send it barreling in the direction it's currently facing. If the monster collides with a wall, it will fall and take damage on a specific body part. If that body part is wounded, it will take additional damage. This will also not work on enraged monsters.
Wounded body parts are "softened", having higher hitzone values.